Process of Rug Making
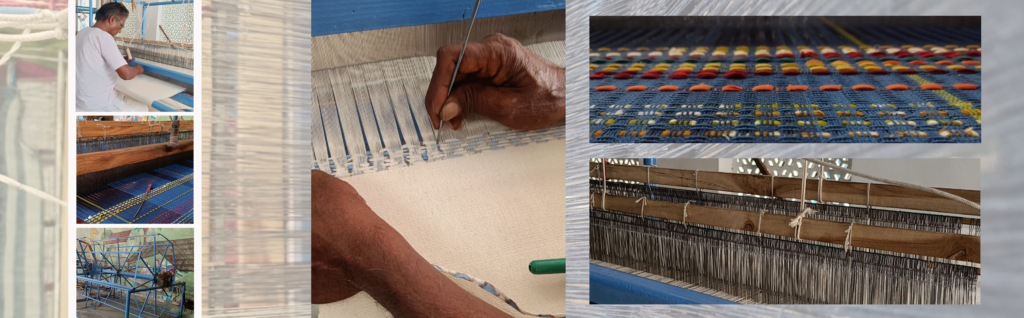
1. WEAVING PROCESS–
The weaving process involves the interlacing of two sets of yarns or threads, known as the warp and weft, to create a woven fabric. The entire weaving process can be described as follows:
WARPING: The first step in the weaving process is to create the warp, which consists of long, parallel threads that run the length of the fabric. The warp is wound onto a beam, and then threaded through the loom.
THREADING: The next step is to thread the warp threads through the heddles and reed of the loom. The heddles are metal or plastic frames with small holes that the warp threads pass through, while the reed is a comb-like device that helps to space the warp threads evenly.
TYING ON: Once the warp is threaded, the weaver ties it onto the cloth beam of the loom, which is located at the back of the loom.
SHEDDING: The shedding process involves raising and lowering alternate sets of warp threads using the loom’s harnesses. This creates an opening, or “shed,” through which the weft thread can be passed.
PICKING: The weft thread is then passed through the shed, either by hand or using a shuttle or other device.
BEATING: After the weft thread is passed through the shed, the reed is pushed forward to beat the weft into place and to create an even fabric.
CHANGING THE SHED: The process of raising and lowering the harnesses to create a new shed is known as “changing the shed.” This process is repeated throughout the weaving process to create the desired pattern and fabric structure.
ADVANCING THE WARP: As the fabric is woven, it is wound onto the cloth beam at the front of the loom. This process is known as “advancing the warp,” and it allows the weaver to create longer pieces of fabric.
FINISHING: Once the fabric is woven, it may go through various finishing processes, such as washing, dyeing, or ironing, to give it its final characteristics and appearance.
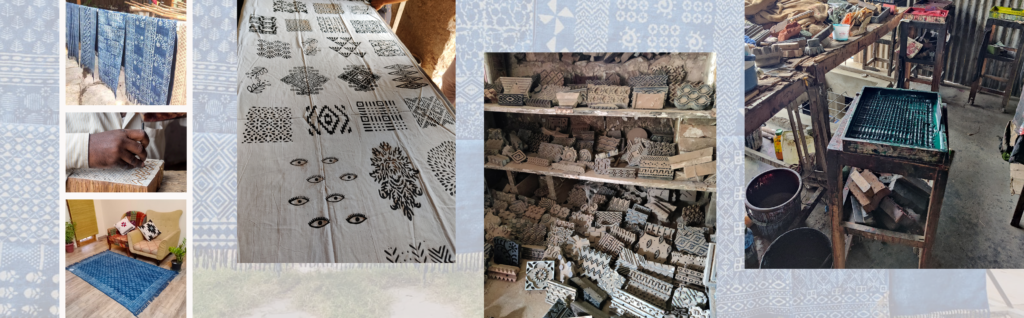
2. BLOCK PRINTING PROCESS–
Block printing is a type of printing that involves the use of a carved wooden block or metal block to transfer ink or dye onto a surface. Here is a general overview of the block printing process:
DESIGNING: The first step in the block printing process is to design the pattern or image that will be printed. This can be done by hand or using a computer program.
CARVING THE BLOCK: Once the design is finalized, it is transferred onto a block of wood or metal. The areas that will not be printed are carved away, leaving the raised areas that will transfer the ink or dye.
PREPARING THE INK: The ink or dye is prepared by mixing pigment or colorants with a binder or vehicle to make a smooth paste. The consistency of the ink should be thick enough to hold its shape, but not too thick that it won’t spread evenly on the block.
INKING THE BLOCK: The block is then inked by applying the ink onto the raised surface of the block with a brush or roller. The ink should be applied evenly and in a thin layer.
TRANSFERRING THE INK: The inked block is then carefully placed onto the surface to be printed, and pressure is applied evenly to transfer the ink from the block to the surface. This can be done by hand, or using a press.
REPEATING THE PROCESS: The block is then cleaned and re-inked, and the process is repeated to create a repeating pattern or design. Multiple blocks may be used to create more complex designs with different colors.
DRYING AND FINISHING: Once the printing is complete, the fabric or paper is allowed to dry, and then heat-set or washed to fix the ink or dye. The finished product may be further embellished or finished depending on the desired outcome.
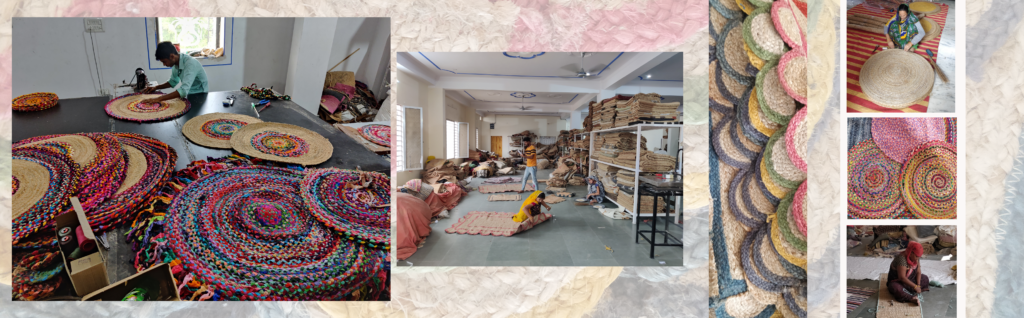
3. BRAIDING PROCESS–
Braiding is a technique of interlacing three or more strands of hair, thread, or other materials to create a patterned structure. It is a versatile and creative process that has been used for thousands of years to create functional and decorative items. Braiding can be done using a variety of materials and techniques, and it can be used to make everything from simple friendship bracelets to complex lacework.
Braiding can be done using a variety of techniques, including traditional braiding, French braiding, Dutch braiding, and fishtail braiding. Traditional braiding involves simply interlacing three strands of material, while French braiding involves gradually adding more strands of material as you move down the braid. Dutch braiding is similar to French braiding but involves weaving the strands under, rather than over, the other strands. Fishtail braiding involves taking two strands of material and weaving them back and forth over each other.
Braiding can be used to make a wide range of items, including hair accessories, clothing, jewellery, and home decor. Some examples of braided items include hair braids, friendship bracelets, belts, shoelaces, rugs, baskets, and even furniture. Braiding is a fun and easy way to add texture and dimension to any project, and it is a great way to express your creativity and style.
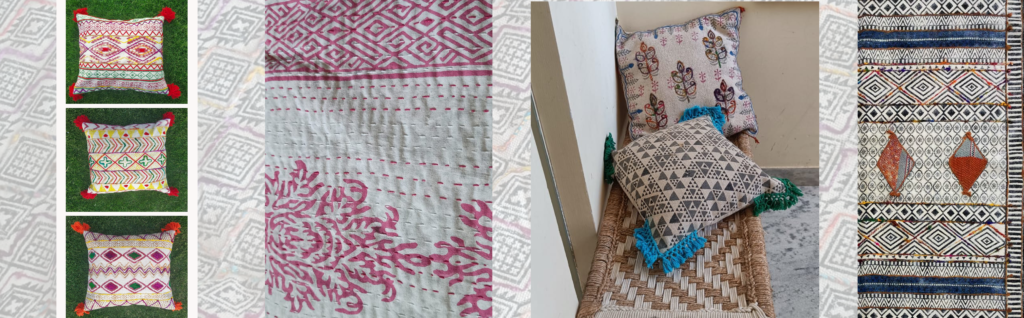
3. EMBROIDERY PROCESS–
An embroidered rug is a type of rug that is embellished with decorative designs or patterns using embroidery techniques. Embroidered rugs can be made from a variety of materials, including wool, cotton, silk, and synthetic fibers, and can feature intricate patterns, scenes, or symbols.
To create an embroidered rug, you will need:
Rug base: This can be a pre-made rug or a piece of fabric cut to the desired size and shape.
Embroidery thread: You can use a variety of threads, including cotton, silk, wool, or synthetic fibers, depending on the look you want to achieve.
Embroidery needle: A needle with a large eye and sharp point is best for embroidery.
Embroidery hoop: A hoop can help keep the fabric taut and prevent wrinkles while you are stitching.
Embroidery pattern: You can use a pre-made pattern or create your own design.
To make the rug-
Choose your design: Decide on the design or pattern you want to create. You can draw your own design or use a pre-made pattern.
Transfer the design: Transfer the design onto the rug base using a fabric pen or pencil. You can also use an iron-on transfer or embroidery software to create your design.
Secure the rug base: Place the rug base in an embroidery hoop to keep it taut while you work.
Start stitching: Use the embroidery thread and needle to stitch the design onto the rug base. You can use a variety of stitches, including satin stitch, stem stitch, and French knot, to create different textures and effects.
Finish the rug: Once you have completed the embroidery, remove the rug from the hoop and secure any loose threads. You can also add a backing or nonslip rug pad to the bottom of the rug if desired.
Embroidered rugs are a beautiful and unique way to add color and texture to your home decor. With a little creativity and some basic embroidery skills, you can create a one-of-a-kind rug that will be a treasured addition to your home.
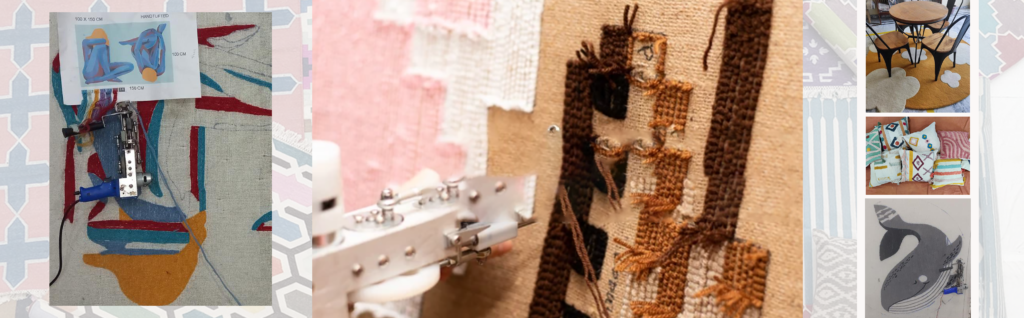
4. HAND TUFTING PROCESS–
The process of making a hand tufted rug typically involves the following steps:
Design: The first step in making a tufted rug is to come up with a design. This can be done by sketching out the design by hand or using computer software.
Materials: Once the design is finalized, the materials for the rug are selected. This typically includes a backing material, yarn, and any additional materials such as a non-slip pad.
Tufting: The next step is tufting, which involves using a handheld tool called a tufting gun to punch yarn through the backing material to create loops or cut piles. The yarn is usually held in place with a layer of latex, which is applied to the back of the rug.
Shearing: After the tufting is complete, the rug is sheared to create a smooth, even surface. This is done by trimming the tops of the loops or cut piles to the same height.
Binding: Once the rug is sheared, the edges are bound to prevent fraying. This can be done by sewing a binding tape around the edges of the rug.
Finishing: Finally, the rug is finished by adding any additional details or embellishments, such as a fringe or a non-slip pad.
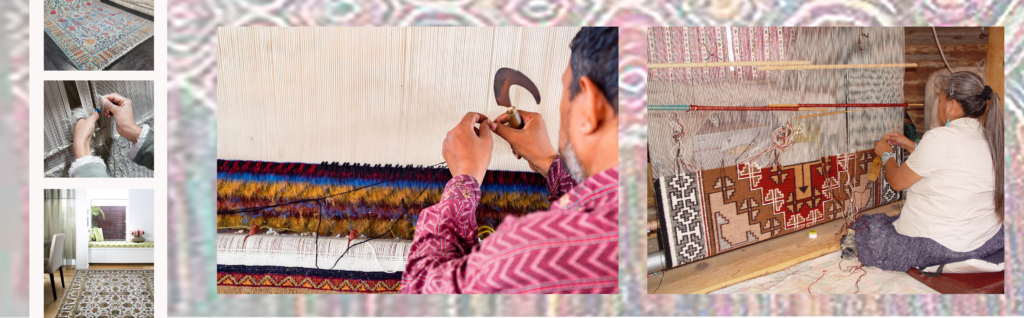
5. HAND KNOTTING PROCESS–
The process of making a hand-knotted rug typically involves the following steps:
Design: The first step is to create a design for the rug, which can be done by hand or using computer software.
Materials: Once the design is finalized, the materials for the rug are selected. This typically includes a backing material, usually made of cotton, silk or wool, and a variety of yarns, including wool, silk, or cotton.
Weaving the Foundation: The backing material is stretched onto a loom, and the warp threads are tied onto the loom. These threads form the foundation of the rug.
Knotting the Pile: The weaver then begins knotting the pile onto the warp threads, row by row, using a knotting technique specific to the design. This involves tying individual knots around pairs of warp threads, and then cutting the yarn to create a pile.
Shearing: Once a section of the rug has been knotted, the pile is sheared to create an even surface. This is done using a specialized tool that cuts the pile to the same height.
Washing: The rug is then washed to remove any excess yarn fibers, dirt, or debris that may be present.
Drying: The rug is dried in a specialized drying room, often using fans or heaters to speed up the process.
Trimming and Finishing: After the rug is completely dry, the excess warp threads are trimmed, and the edges are bound to prevent fraying. Any additional details or embellishments, such as a fringe, are added at this point.
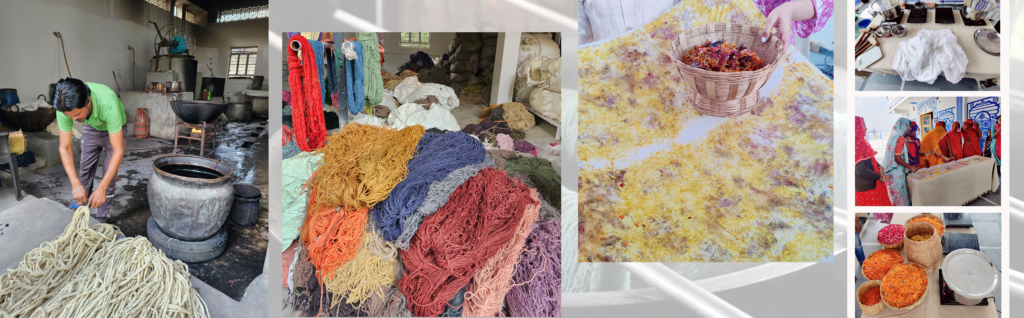
6. NATURAL DYEING PROCESS–
The process of natural dyeing involves using natural materials, such as plant extracts, minerals, or insects, to dye fabrics or fibers. The process typically involves the following steps:
Preparation: The first step is to prepare the fabric or fibers for dyeing by washing and soaking them in water.
Mordanting: Mordants are chemicals that help the dye adhere to the fabric or fiber. Common mordants include alum, iron, and copper. The fabric or fiber is soaked in a mordant solution, typically made by dissolving the mordant in hot water.
Dyeing: The natural dye material is prepared by soaking it in water and boiling it to extract the color. The fabric or fiber is then soaked in the dye bath, typically for several hours or overnight. The longer the fabric or fiber is soaked in the dye bath, the darker the color will be.
Fixing: After the fabric or fiber has been dyed, it is rinsed in water to remove any excess dye. A fixative, such as vinegar, is then added to the rinse water to help set the color.
Washing and Drying: Finally, the fabric or fiber is washed to remove any remaining dye or fixative, and then dried.
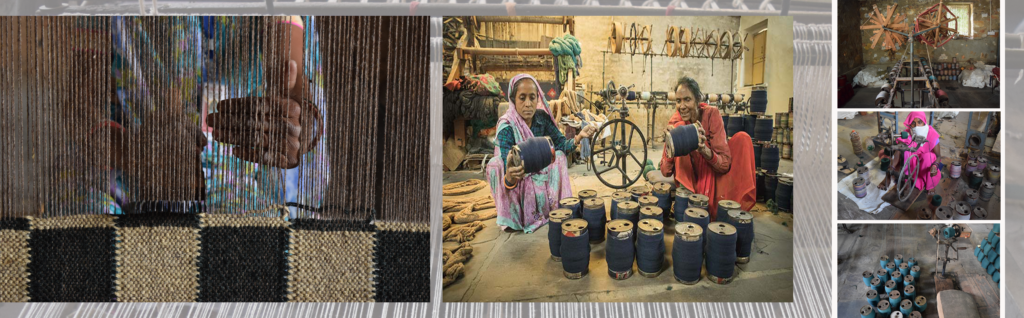
7. HANDLOOM CLOTHING –
Handloom weaving is a process of creating fabric by interlacing threads on a loom using a shuttle. The process involves several steps, including yarn preparation, warping, weaving, and finishing. Here is a brief overview of each step:
Yarn Preparation: The first step in the handloom weaving process is preparing the yarn. The yarn is usually made from natural fibers such as cotton, silk, or wool. The fibers are spun into yarn using a spinning wheel or a spindle. The yarn is then dyed in different colors using natural or synthetic dyes.
Warping: The next step is warping, which involves winding the yarn onto a warping board. The warping board is a frame that holds the yarn in a specific order to create a specific pattern. The warp threads are then wound onto a beam, which is placed on the loom.
Weaving: Once the warp is set up on the loom, the weaving process begins. The weaver uses a shuttle to pass the weft thread over and under the warp threads to create the fabric. The weft thread is wound onto a shuttle, which is passed through the shed (an opening in the warp) to create the weave.
Finishing: After the fabric is woven, it is removed from the loom and finished. The finishing process involves washing, pressing, and sometimes embellishing the fabric. The fabric may also be cut and sewn into garments.